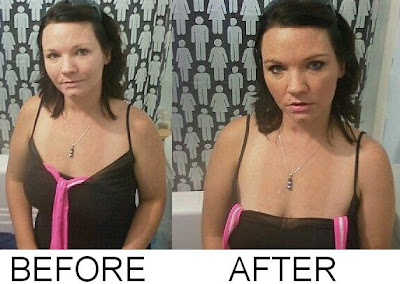
There's nothing I love more than playing with my lady friends' faces! Makeovers are my fave thing to to and anytime someone is willing to let me play, I take the opportunity and jump for joy! My friend, Mindy, was more than willing to let me try out a new look on her and she was pleasantly surprised with the results. Here's how I created the look:
- I applied a tinted moisturizer all over Mindy's face. Not only did it cover up some trouble areas, it also worked as a primer for the makeup I was applying. It made a great base and evened out her skintone, which is a HUGE deal. I like tinted moisturizer more than foundation, especially in the summer, because it lets your natural beauty shine through. No one wants to look like they've got tons of makeup caked on. It's simply not flattering.
- Next, I brushed on a light shimmery eye shadow as a base. Victoria's Secret has some great ones--their Silky Eye Shadow in Lustre (a champagne-ish hue) works perfectly for this. It adds just enough shimmer to draw attention to the eye, but since it's a shimmer rather than a glitter shadow, you don't end up looking like a disco ball. Win-win!!
- After the eyeshadow base was applied, I used a soft black eyeliner pencil (Prestige has a divine Soft Khol Liner that applies smoothly and blends like a dream). Using the soft black pencil, I lined Mindy's lids, starting with a thin line on the inside corner and working out to a thicker line towards the outer edge. This lifts the eye and flatters nearly every eye shape. I also used a light brown pencil on the bottom lash line, but only on the outer half of the eye--again, to give the illusion of a more lifted eye.
- Next, I used a few different brown eye shadows to create a subtle smokey eye. A medium brown hue worked as an all-over color, while dark brown blended nicely into the black liner and on the outside corner of the lid. The colors in Sephora's Beauty in a Box Brown Smoky Eye Palette rock for this step.
- Using a light concealer, I covered up the under-eye area. I always save this step for after the eye shadow has been applied because if any shadow is spilled or smudged under the eye area, it's an easy fix since there's no makeup there to begin with. It also works as a great blending tool for the lower lash line--blend the concealer upwards and smudge it into the liner for a more natural, less harsh, look.
- Next, I curled Mindy's lashes using a simple eyelash curler. You don't need to go crazy and spend tons of money on a curler. Most of the time, the lash curlers you see at drugstores are totally sufficient.
- After curling the lashes, I applied two coats of Hard Candy's 1,000 Lashes Mascara. It uses actual fibers to extend lashes. For extra glam, I also added a couple coats of CoverGirl's LashBlast Mascara. I really love this stuff because it leaves lashes clump-free, while adding volume at the same time.
- Lastly, I used a big fluffy brush and swept on a light bronzer where the sun would naturally hit, and a bright blush underneath the cheekbones.

